Thank you for visiting our fly tying blog! Here you will find free step-by-step instructions for fly patterns that we have found to be very successful while fishing on the Tributaries of Lake Erie known as " Steelhead Alley." You will also be able to see step-by-step instructions for warm water, tube, trout, and destinational fly patterns. If you would like to request a pattern tutorial that you do not see, please send requests to team@steelheadalleyoutfitters.com


Showing posts with label Senyo's Ice Man Minnow. Show all posts

Wednesday, May 20, 2009

Tube Fly: Senyo's Ice Man Minnow; Creek Chub Version

Requested Fly Pattern

Step 1: Assemble a Eumer Micro Tear drop tube and attach red 6/0 thread to the base of the plastic x-small liner tube. Steps for assembling Eumer's tube bodies can be found in the ABC's of tube tying in our fly tying links section.

Step 2: Attach a very small amount of yellow dubbing ( your choice) by tying down in the center of the material. It will be folded over onto itself to form the belly of the Chub.

Step 3: Attach a small clump of Hare line Copper Ice Dub by the center of the material, and once again fold the wing back onto itself. This will form the body of the creek chub.

Step 4: Attach a very small amount of brown dubbing ( your choice) and fold over the dub like you did in previous steps.

Step 5: Apply a drop of Zap-A-Gap to the thread base and place two small silver prismatic eyes one to each side of the pattern.

Step 6: Rotate the tube upside down and apply Loon's UV Knot Sense to the thread base and the eyes. A UV lamp is used to cure this epoxy. 2 part epoxy can be used as a substitute on this step.

Final: Add a Diiachi X510 #10

The Senyo's Ice Man Minnow is one of the fastest and easiest minnow patterns to tie, and the colors can be changed to match any bait fish species found around the region. This Tube Pattern has accounted for more Steelhead, Trout, and Small mouth for me this season than any other pattern.

Simple to tie, Fast to fill your box, Extremely effect every where.
15" Pennsylvania Brook Trout on a Tan/Pearl Ice Man Minnow Tube.

Buck steelhead that took this Blue/ Chartreuse Ice Man Minnow on the Grand River, Ohio.

Lake Erie Small Mouth Bass that took a "Key Lime" Chartreuse Ice Man Minnow.

Wednesday, February 11, 2009

Tube Fly: Ice Man Minnow

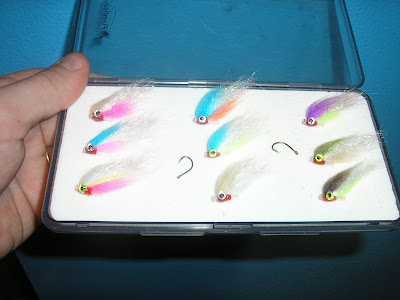
Easy Minnow Pattern tied on Eumer's Medium Plastic Tube.

Color combinations can easily be created to match the water conditions and hot color of choice while on the river

Step #1: Take a 1/2 inch piece of Eumer Medium plastic tube. Wrap red tying thread which will become the gills of the fly evenly covering roughly a 1/4 inch in the center of the tube. Center tie a small clump of Pink Laser dub and fold the dubbing over onto itself.

Step #2: Center tie in a clump of Hare Line Pearl Ice Dubbing and fold over onto itself.

Step #3: Example of dubbings being folded over.

Step #4: Center tie in a small clump of Tan Laser Dub and repeat fold over of the material.

Step #5: Tie of the thread and attach 1 silver 3D prismatic eye to each side of the minnow.

Step #6: Turn the fly over and coat the thread and eyes with Loon's UV Knot Sense. Use a UV drying lamp or light to cure epoxy.

Step #6: This step can also be done as a group of flies to speed up the amount of patterns that can be produced while at the vice.

Final: Add a Diiachi X510 #10 to the rear of the pattern.
Here is a fast, easy, and effective minnow pattern for your fly box. My favorite way to fish this fly is to float it under an indicator, but it has also produced on the swing or by stripping the fly pattern during low water conditions

A bunch of colors can be created in minutes.

Thursday, October 30, 2008

Minnow Pattern- Senyo's Ice Man Minnow

Tied as published in Matt Supinski's December 2007 article in Fly Fisherman Magazine.
Step #1: Attach White Uni Thread 6/0 to a Diiachi X120 #10
Wind thread to center of hook.
Step #2: Take a small amount of Flo. Pink Hareline Ice Dub and tie in center, so that even material sticks out both sides and secure to center of hook.

Step #3: With you free hand fold front section of ice Dub back over the top of rear exposed Ice Dub, and then give a few securing wraps of thread in front of the material. This forms the under belly of the minnow.

Step #4: Repeat steps 2 and 3 with a Hareline UV pearl Ice Dubbing. and secure thread in front of material. This section is the under wing and becomes the body of the minnow.


Step #5: Repeat steps 2 and 3 again this time with Hareline Steely Blue Ice Dubbing. This becomes the back on the minnow and finishes forming the fly body. Secure material with a few wraps of thread in front of material.


Step #6: Build a tapered head with your thread in front of the completed body. This will become the section were your eyes will be glued to in next step. With your tying scissors trim the rear of the wings to form an even minnow taper.( see photo above)


Step #7: Whip finish or half hitch thread in front of hook eye and cut thread. Second place one 3d prismatic Chartreuse eye or equivalent on each side of thread head you created, and secure with Zap A Gap or epoxy.( allow time to dry)


Final step: With a Sharpe red permanent marker make visible gill plates behind both eyes. The minnow is finished. This fast and practical minnow can be tied in several color combos to match any water condition, and is extremely effective on steelhead alley.