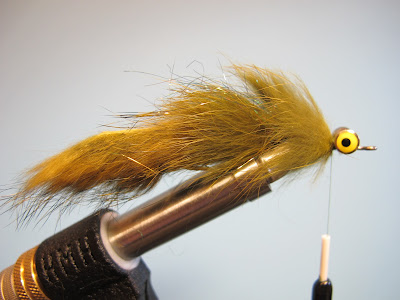
Having just moved to the midwest from Maine this past fall I have found that there are some serious gaps in my fly boxes when it comes to warm water fishing. I needed to develop a few patterns that I could spin up quickly to fill the boxes. These flies had to be relatively economical to tie, and versatile enough to be used on a variety of warm water species here in Ohio. Among numerous bugger and crayfish type patterns, the Stove Top Sculpin was born.
Hook: Gamakatsu SL11-3H size 4
Shank: 20mm Articulated Shank from Fish Skull
Thread: 6/0 Olive Uni-Thread
Rear Body: Black Barred Rabbit Strip Olive Variant
Olive Crosscut Rabbit
Ice Dub - Peacock
Front Body: Olive Crosscut Rabbit
Fins: Mini Marabou - Brown or Sculpin Olive (Grizzly)
Eyes: 7/32" Real Eyes Plus (or 3/16" I-Balz for a wider profile)
Head: Olive Sculpin Wool
STEP 1: Place the SL11-3H inverted in the jaws of your vise and tie onto the hook shank backward toward the bend of the hook.
STEP 2: Remove the hook from the jaws of the vise and impale the barred rabbit strip on the hook point leaving about 1" of the strip extending beyond the puncture point in the back. Separate the fur and lash down the strip just ahead of the bend, then advance the thread forward leaving about 1/4" to the eye.
STEP 3: Trim the end of the rabbit strip and secure it to the hook shank leaving at least an eye length to the eye of the hook.
STEP 4: Tie in the olive crosscut rabbit on top of the thread wraps and palmer forward to the eye. Secure the tag end, trim, and make several neat wraps over the trimmed end of the rabbit strip.
STEP 5: Center tie a clump of peacock colored Ice Dub at the head, spreading the material all the way around the hook shank. Whip finish and apply a drop of Zap-A-Gap to the head.
STEP 6: Attach the 20mm shank by running the open end through the eye of the SL11, turn the hook so that the point is down, and place the shank in the jaws of your vise. Tie onto the shank with your thread and secure the open end of the shank.
STEP 7: Attach the barbell eyes to the shank leaving at least an eye length to the eye of the shank, then wrap the thread backward toward the connection point. The underside of the fly is now on top. The fly will ride point up when finished.
STEP 8: Tie in a piece of crosscut rabbit near the connection point and palmer it forward to just behind the eyes. Make a nice thread base to tie the feathers in for the fins.
STEP 9: Select 3 mini marabou plumes for each side of the fly. I used chickabou from the underside of a ringneck pheasant skin for this fly, but Hareline mini marabou works great as well. Stack the 3 plumes and tie them in on each side of the fly.
STEP 10: Tie in clumps of sculpin wool around the barbell eyes starting with a clump on top and on bottom behind the eyes. Work your way forward to the hook eye tying clumps of wool in. Whip finish at the eye of the hook.
STEP 11: Carefully sculpt the head of the fly while preening the mini marabou plumes and crosscut rabbit fibers backward.
STEP 12: Flip the fly over and color the head with a Prismacolor marker or Sharpie. Apply a drop of Zap-A-Gap on the thread wraps behind the eye and you are ready to fish.
If you have questions about this fly that were not addressed in this tutorial, please feel free to contact me at mdecoteau@gmail.com.
More of my work can be viewed at: https://www.facebook.com/redspotfly
Mike Decoteau
RedSpotFly


