Shank: 20mm Articulated Shank from Flymen Fishing Company
Wire: 20 lb. Surflon American Fishing Wire
Bead: 6mm Trout Bead
Hook: Size 4 Gamakatsu Octopus
Thread: 6/0 Olive Uni-Thread
Eyes: 5/32 BallZeyes
Tail: Olive Rabbit Zonker
Flash: Root Beer Krystal Flash
Body: Olive Schlappen
Head: Sculpin Olive Senyo's Laser Dub
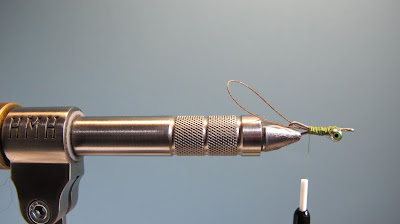
STEP 1: Place the 20mm shank in the jaws of your vise. Lash onto the shank and wrap toward the back of the shank, closing the rear loop.
STEP 2: Cut a piece of the 20 lb. wire about 2 1/2 inches long. Tie the wire in on the sides of the shank allowing the tag ends to extend to the eye of the shank. Fold the tag ends of the wire back under the shank and make several wraps over them. The rear loop should be large enough to slide a 6mm trout bead on and still fit a size 4 hook through.
STEP 3: Tie in the 5/32 eyes on the underside of the shank. Leave a little bit of room to the eye for tying in the head material.
STEP 4: Cut a rabbit strip that is about 1/4" longer than the wire loop. Tie this in at the back of the shank, followed by 4 strands of Krystal Flash on top. Make sure that the tail finishes at the same length as the overall fly with the hook attached.
STEP 5: Tie in an olive schlappen feather by the tip and palmer forward to the back of the eyes. Tie off and trim the butt end of the feather.
STEP 6: Hand stack and tie in clumps of Sculpin Olive Laser Dub to form the head. Start with a clump on top and bottom just behind the eyes. Do the same on top and bottom of the eyes. Then repeat just ahead of the eyes.
STEP 7: Whip finish, then sculpt the head. Though I realize that it is not typical to sculpt Laser Dub heads, this fly looks much better in the water with a haircut. Hit the thread head with a spot of Zap-A-Gap and you're ready to chase your favorite sculpin-eating fish.
If you have questions about this fly that were not addressed in the tutorial or are interested in ordering, please feel free to contact me at mdecoteau@gmail.com. More of my work can be viewed at: https://www.facebook.com/redspotfly
Michael Decoteau
RedSpotFly
HMH Signature Tyer


