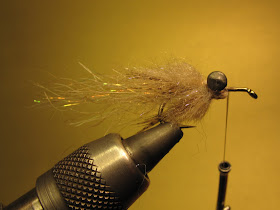
Thread: Tan UTC140 denier
Hook: Daiichi 1530 (alt Mustad 3906) size 6
Eyes: Lead barbell, medium
Tail: SLF Flash Blend, tan
Body1: Hungarian Partridge
Body1a: (optional) Senyo Shaggy Dub, red
Body2: Senyo Laser Dub, blend of tan and brown
Alt color1: olive SLF with sculpin olive Laser Dub
Alt color2: pearl SLF with minnow belly Laser Dub
 STEP 1: With your Daiichi 1530 size 6 in the vise, get your dark brown 140 denier thread started at the head and then wrap halfway back down the hook shank.
 STEP 2: Using tight figure eight wraps secure a medium lead barbell eye to the top of the hook shank.
 STEP 3: Off the back of the hook shank tie in a sparse clump of tan SLF Flash Blend. I try to trim it down to a taper about one and a half times the shank length.
 STEP 4: At the back of the fly tie in a Hungarian Partidge feather by the tip and palmer it forward a few wraps.
 (OPTIONAL) Instead of the HP you can tie in a few clumps of red Senyo Shaggy Dub to imitate bleeding gills.
 STEP 5: For this color variation I prepare a bunch of mottled Senyo Laser dub by using the Farrar blending method to combine tan and brown. Then starting behind the lead eyes tie in a clump with several tight wraps in the middle and then fold the Laser Dub over itself and add a few tight wraps at the base of the material.
 STEP 5: For this color variation I prepare a bunch of mottled Senyo Laser dub by using the Farrar blending method to combine tan and brown. Then starting behind the lead eyes tie in a clump with several tight wraps in the middle and then fold the Laser Dub over itself and add a few tight wraps at the base of the material.
STEP 7: Continue to repeat as you move up the hook shank until you get to the eye of the hook, then whip finish and remove the thread. What you have now pretty much looks like a hairball with a tail.
 STEP 8: To finish the fly tease out the Laser Dub and trim down the head to a basic wedge shape, similar to a standard sculpin head.
 STEP 8: To finish the fly tease out the Laser Dub and trim down the head to a basic wedge shape, similar to a standard sculpin head.
Note: Generally I trim each down to a basic sculpin wedge knowing that once on the water I can use my nippers to further alter the head shape if the intended imitation needs a different silhouette.
 The resulting fly is easy to cast but will get down quickly. Short 2-3" strips will bring the fly back in an erratic swimming motion that will drive any hungry fish wild!
 The resulting fly is easy to cast but will get down quickly. Short 2-3" strips will bring the fly back in an erratic swimming motion that will drive any hungry fish wild!
To order this pattern or my other patterns, or if you have any questions about the pattern that were not addressed, please visit http://www.anglerschoiceflies.com/ or find me at Anglers Choice Flies on Facebook.


