
Front Hook: Daiichi 2220, size 6
Trailer Hook: Daiichi 2553, size 6
Bead: 6mm Chaser
Tail: Marabou
Flash: Magnum Holographic Flashabou
Body: Schlappen
Head1: Senyo Laser Dub
Head2: UV Ice Dub
 STEP 1: Place the size 6 Daiichi 2220 firmly in the vise, then get your thread started and wrap back to the rear tie in point.
 STEP 2: Prep the step by utilizing a loop to loop connection to attach the Daiichi 2553 stinger hook to a length 25lb braided Fireline, you will at this point also want to slide the 6mm chaser bead on to the line. To attach the trailer hook use tight wraps forward to the eye then back to the rear tie in point, securely binding the doubled over Fireline to the hook shank. If tied under maximum thread tension there is no need to use adhesives as there is no way this will pull out. It should extend off the back resulting in a total fly length of approximately four inches.
 STEP 3: Choose a marabou feather that does not have a prominent center stem then tie it in off the rear of the hook, with the tips tapering out about at the placement of the bead. When tying in the feather allow it to spin a bit about the hook shank, thereby ensuring coverage around the entire shank. Tie the marabou down covering about three quarters of the hook shank, doing so will provide protection for the stem of the schlappen in the next step thereby alleviating the need to dub a body or wrap cactus chenille.
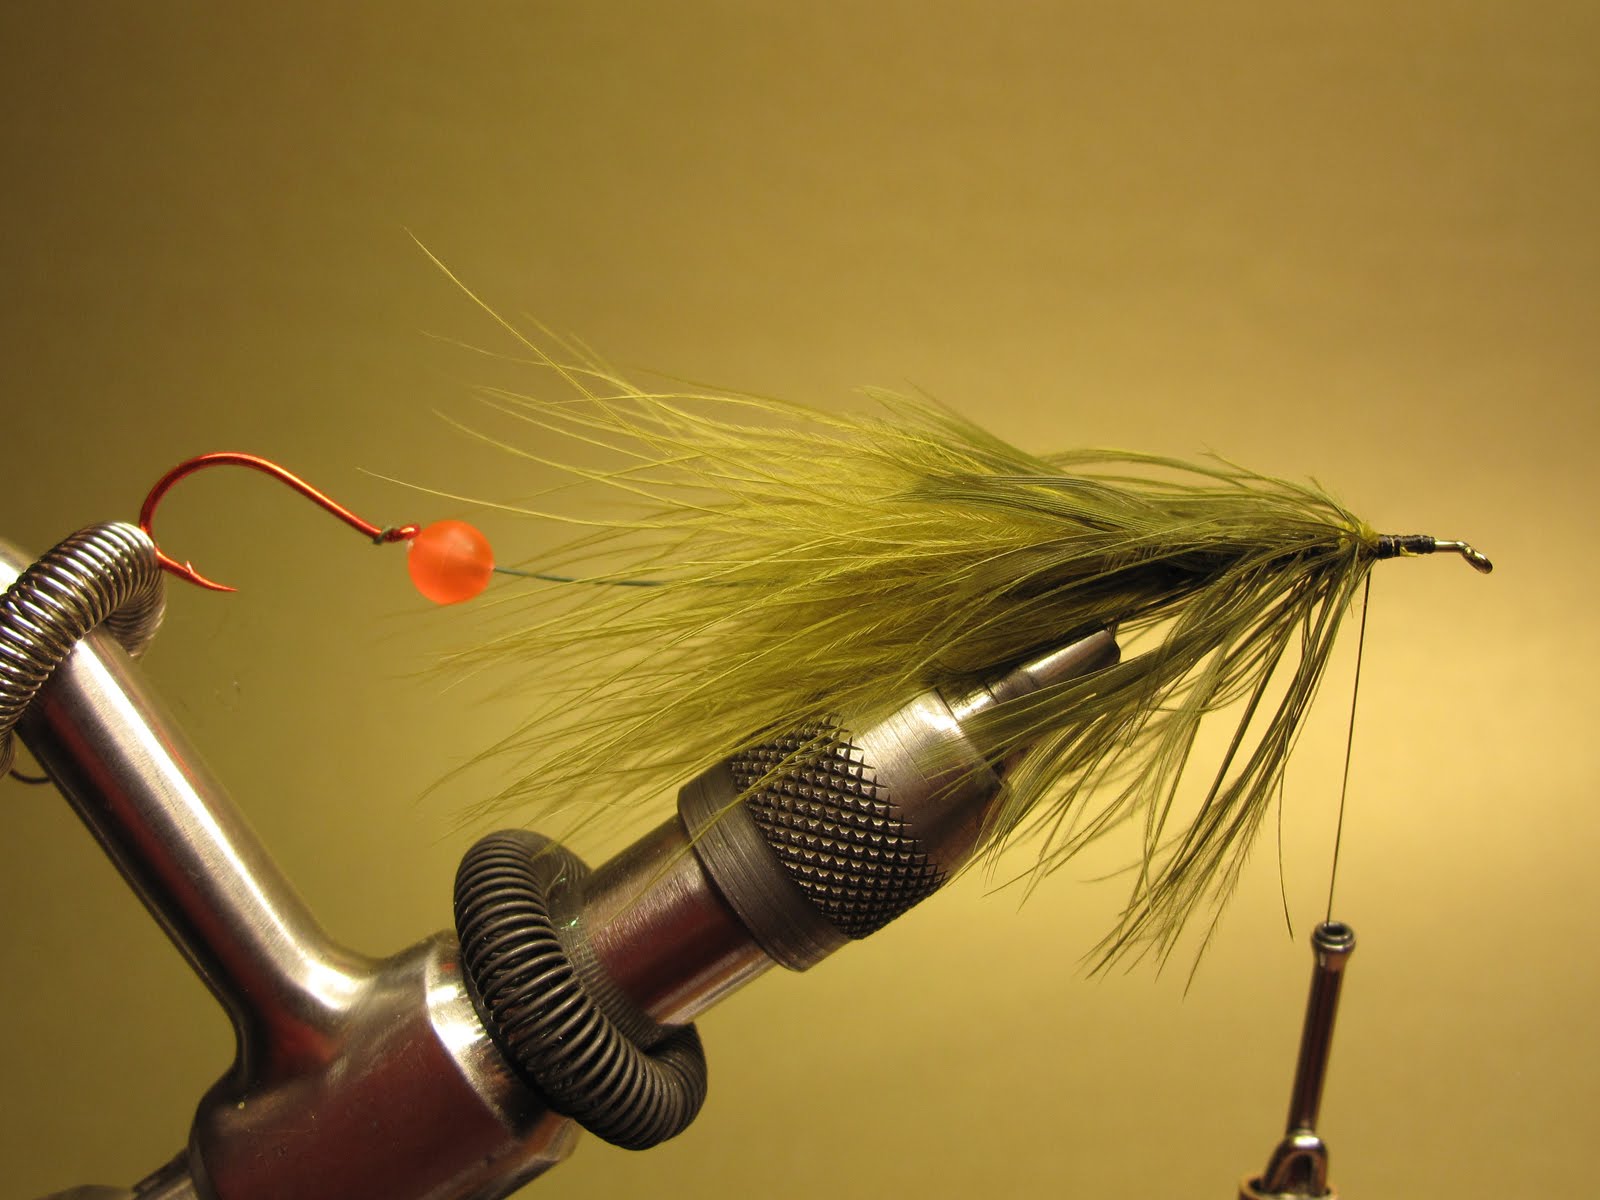
STEP 4: Carefully prepare a schlappen feather by holding it by the tip and stroking the fibers down to provide a tie in point on the stem. Securely attach the feather and wrap your thread forward, then palmer the feather forward approximately three quarters of the hook shank. When palmering the feather forward be careful not to trap fibers against the hook shank.
 STEP 5: The most obvious flash component on this fly is the Magnum Holographic Flashabou. Tie in four to five strands extending back to about where the bead is. Make sure to taper them a bit at the rear of the fly so there is not a 'hard edge' where the Flashabou ends. Personally I like to tie in two pieces by the middle and fold it back over itself so that the flash will not pull out. The Magnum Flashabou is twice as thick as the standard variety and seems to be more stiff out of the water. In the water the Magum Flashabou swims and dances in the current similarly to the marabou, but it is less prone to wrapping around the other materials and fouling the fly.
 STEP 6: The head of this fly is comprised primarily of Senyo Laser Dub. Pull out a chunk of Laser Dub and prepare it by separating and stacking it in your fingers, similar to the Farrar Blending method, to align the fibers in one direction. Once prepped you will slide the chunk of Laser Dub over the eye of the hook and give a few tight wraps in the middle of the material, then fold it back over itself and give a few tight wraps around the shank at the base of the material. This will make for a nice bulky head that will push around a lot of water.
 STEP 7: The last material to be added is the second element of flash, UV Ice Dub. The UV Ice Dub adds a bit of flash around the head of the fly and, depending on what your convictions are about fish and the UV light spectrum, may actually make the fly more visible and attractive to fish! To tie it in I take a small clump and center tie it in, as I did the Laser Dub, then fold it back over itself so that it flows back around the whole front of the head. Hold the head back out of the way, whip finish, and you are all set to hit the water. If you would like to make the fly a true stinger fly then you can carefully clip the Daiichi 2220 just before the bend and then hit the raw edge with a few rubs of sandpaper to make sure there are no burrs that could knick the Fireline. Unless I am fishing regulated water requiring only one hook I generally leave both hooks on this pattern for my personal use.
 Due both to the length as well as the bulk of the head, the GHB (Gotta Hot Butt) is most effective as a pattern when it swung in high and off color water. When the water flows around the bulky head of this fly it causes a lot of motion in the rear of the fly as it swings through the water column. The marabou and Flashabou will wiggle around and the bead will practically dance, truly becoming an additional trigger point for any steelhead looking for a meal.
To order this pattern or my other patterns, or if you have any questions about the pattern that were not addressed, please visit http://www.anglerschoiceflies.com/, or find me at Anglers Choice Flies on Facebook.
 STEP 5: The most obvious flash component on this fly is the Magnum Holographic Flashabou. Tie in four to five strands extending back to about where the bead is. Make sure to taper them a bit at the rear of the fly so there is not a 'hard edge' where the Flashabou ends. Personally I like to tie in two pieces by the middle and fold it back over itself so that the flash will not pull out. The Magnum Flashabou is twice as thick as the standard variety and seems to be more stiff out of the water. In the water the Magum Flashabou swims and dances in the current similarly to the marabou, but it is less prone to wrapping around the other materials and fouling the fly.
 STEP 6: The head of this fly is comprised primarily of Senyo Laser Dub. Pull out a chunk of Laser Dub and prepare it by separating and stacking it in your fingers, similar to the Farrar Blending method, to align the fibers in one direction. Once prepped you will slide the chunk of Laser Dub over the eye of the hook and give a few tight wraps in the middle of the material, then fold it back over itself and give a few tight wraps around the shank at the base of the material. This will make for a nice bulky head that will push around a lot of water.
 STEP 7: The last material to be added is the second element of flash, UV Ice Dub. The UV Ice Dub adds a bit of flash around the head of the fly and, depending on what your convictions are about fish and the UV light spectrum, may actually make the fly more visible and attractive to fish! To tie it in I take a small clump and center tie it in, as I did the Laser Dub, then fold it back over itself so that it flows back around the whole front of the head. Hold the head back out of the way, whip finish, and you are all set to hit the water. If you would like to make the fly a true stinger fly then you can carefully clip the Daiichi 2220 just before the bend and then hit the raw edge with a few rubs of sandpaper to make sure there are no burrs that could knick the Fireline. Unless I am fishing regulated water requiring only one hook I generally leave both hooks on this pattern for my personal use.
 Due both to the length as well as the bulk of the head, the GHB (Gotta Hot Butt) is most effective as a pattern when it swung in high and off color water. When the water flows around the bulky head of this fly it causes a lot of motion in the rear of the fly as it swings through the water column. The marabou and Flashabou will wiggle around and the bead will practically dance, truly becoming an additional trigger point for any steelhead looking for a meal.
 Using the loop to loop connection for the stinger hook means that you can change the hook out to utilize a standard finish hook or to change the hook size as you deem necessary. Additionally it means you can also change the bead color to better match the water clarity and conditions.
To order this pattern or my other patterns, or if you have any questions about the pattern that were not addressed, please visit http://www.anglerschoiceflies.com/, or find me at Anglers Choice Flies on Facebook.